Good info Doug
Quote :
The repair manual states that putting 6V through the field coils should result in current draw of 2.7A
Voltage = Current x Resistance
e = i x r
6 = 2.7 x Resistance
R = 6 divided by 2.7
2.22 ohms is ideal
Tommy
If you like our site, please consider joining our club!
By joining you will help ensure that we can continue to provide this service
JOIN HERE!
By joining you will help ensure that we can continue to provide this service
JOIN HERE!
R69 (and other) field coil repair?
-
Werner1111
- Posts: 100
- Joined: Fri Dec 16, 2016 6:39 pm
- Location: Hollyweird, CA
Re: R69 (and other) field coil repair?
I haven't yet gone back to the work bench since reading this note, but I'll clarify my experience. The magnetic pull seemed to be greater on one side of the coil than the other (say inside vs outside). When I originally tested the coils (back at the beginning of this adventure) for magnetism while still installed in the rotor, I put the screwdriver to the inside of the coils, only, and two were strong and two were weak.dougthatdoug wrote: ↑Mon Feb 21, 2022 5:07 am
Hmm. I don't think that's how magnets work, unless your screwdriver is also magnetised. All four coils should have the same field strength, just with alternating polarities.
More recently, I ran 6V through several of my new coils, on the bench, with the shoe installed, but not yet mounted in the generator. Depending on how the coil was wired (wrapped cw or ccw), the magnetic pull of the coil was stronger on either the inside or the outside. There was magnetic attraction on both sides, but one side was definitely stronger. I'll try this again and also try the same with the remaining original coils and provide an update. Thanks for the continued help.
EDIT AND UPDATE
I hooked up my new coils, installed on their shoes, to a variable DC power supply. The magnetic pull seems to be the same whether I hold the screw driver on the convex or concave side of the coil.
Last edited by Werner1111 on Mon Mar 14, 2022 11:27 am, edited 1 time in total.
R69 R90/6 R100/7 R100S R1150GSA S2R1000
-
jwonder

- Posts: 784
- Joined: Wed Nov 23, 2016 7:50 pm
- Location: Long Island, New York
- Has thanked: 3 times
- Been thanked: 8 times
- Contact:
Re: R69 (and other) field coil repair?
Werner, please keep going as I am watching this thread and loving everything you are doing!!! I am looking forward for you to figure it all out and educating everyone here!!!
Thank you for sharing all your work!!!
Thank you for sharing all your work!!!
James Wonder
Vice President, Vintage BMW Motorcycle Owners
2022 BMW Friend Of the Marque
Long Island, New York
Vice President, Vintage BMW Motorcycle Owners
2022 BMW Friend Of the Marque
Long Island, New York
-
Werner1111
- Posts: 100
- Joined: Fri Dec 16, 2016 6:39 pm
- Location: Hollyweird, CA
Re: R69 (and other) field coil repair?
James, thanks for the interest! I'm giving this small update today just to let everyone know I'm still moving forward.
This is a little off topic, but relevant to my slow progress. In the intervening weeks since my last update, I acquired a Victor 1630 metal lathe. I'd been looking for the "right" deal for over a year. The "right" deal meant the lathe had to be one of a small list of manufacturers, with good tooling, of the right dimensions/size, and with the ability to thread both SAE and Metric. This Victor met all the criteria. It came with a 3-jaw and 4-jaw chuck, a 5c collet closer, turns both metric and SAE threads and the price was really great. Here it is in my shop.

Just like a new (to me) bike, it requires a thorough going-over, changing the oils, leveling, cleaning, etc... This is my first lathe, so I'm coming up the learning curve.
Back to the field coils... I ran out of magnet wire and bought another spool, from another seller on Amazon, which is a different color and also a slightly different thickness (0.97 vs 0.93mm). I made two coils this weekend, which came out beautifully. My ability to create nicely shaped coils has improved.

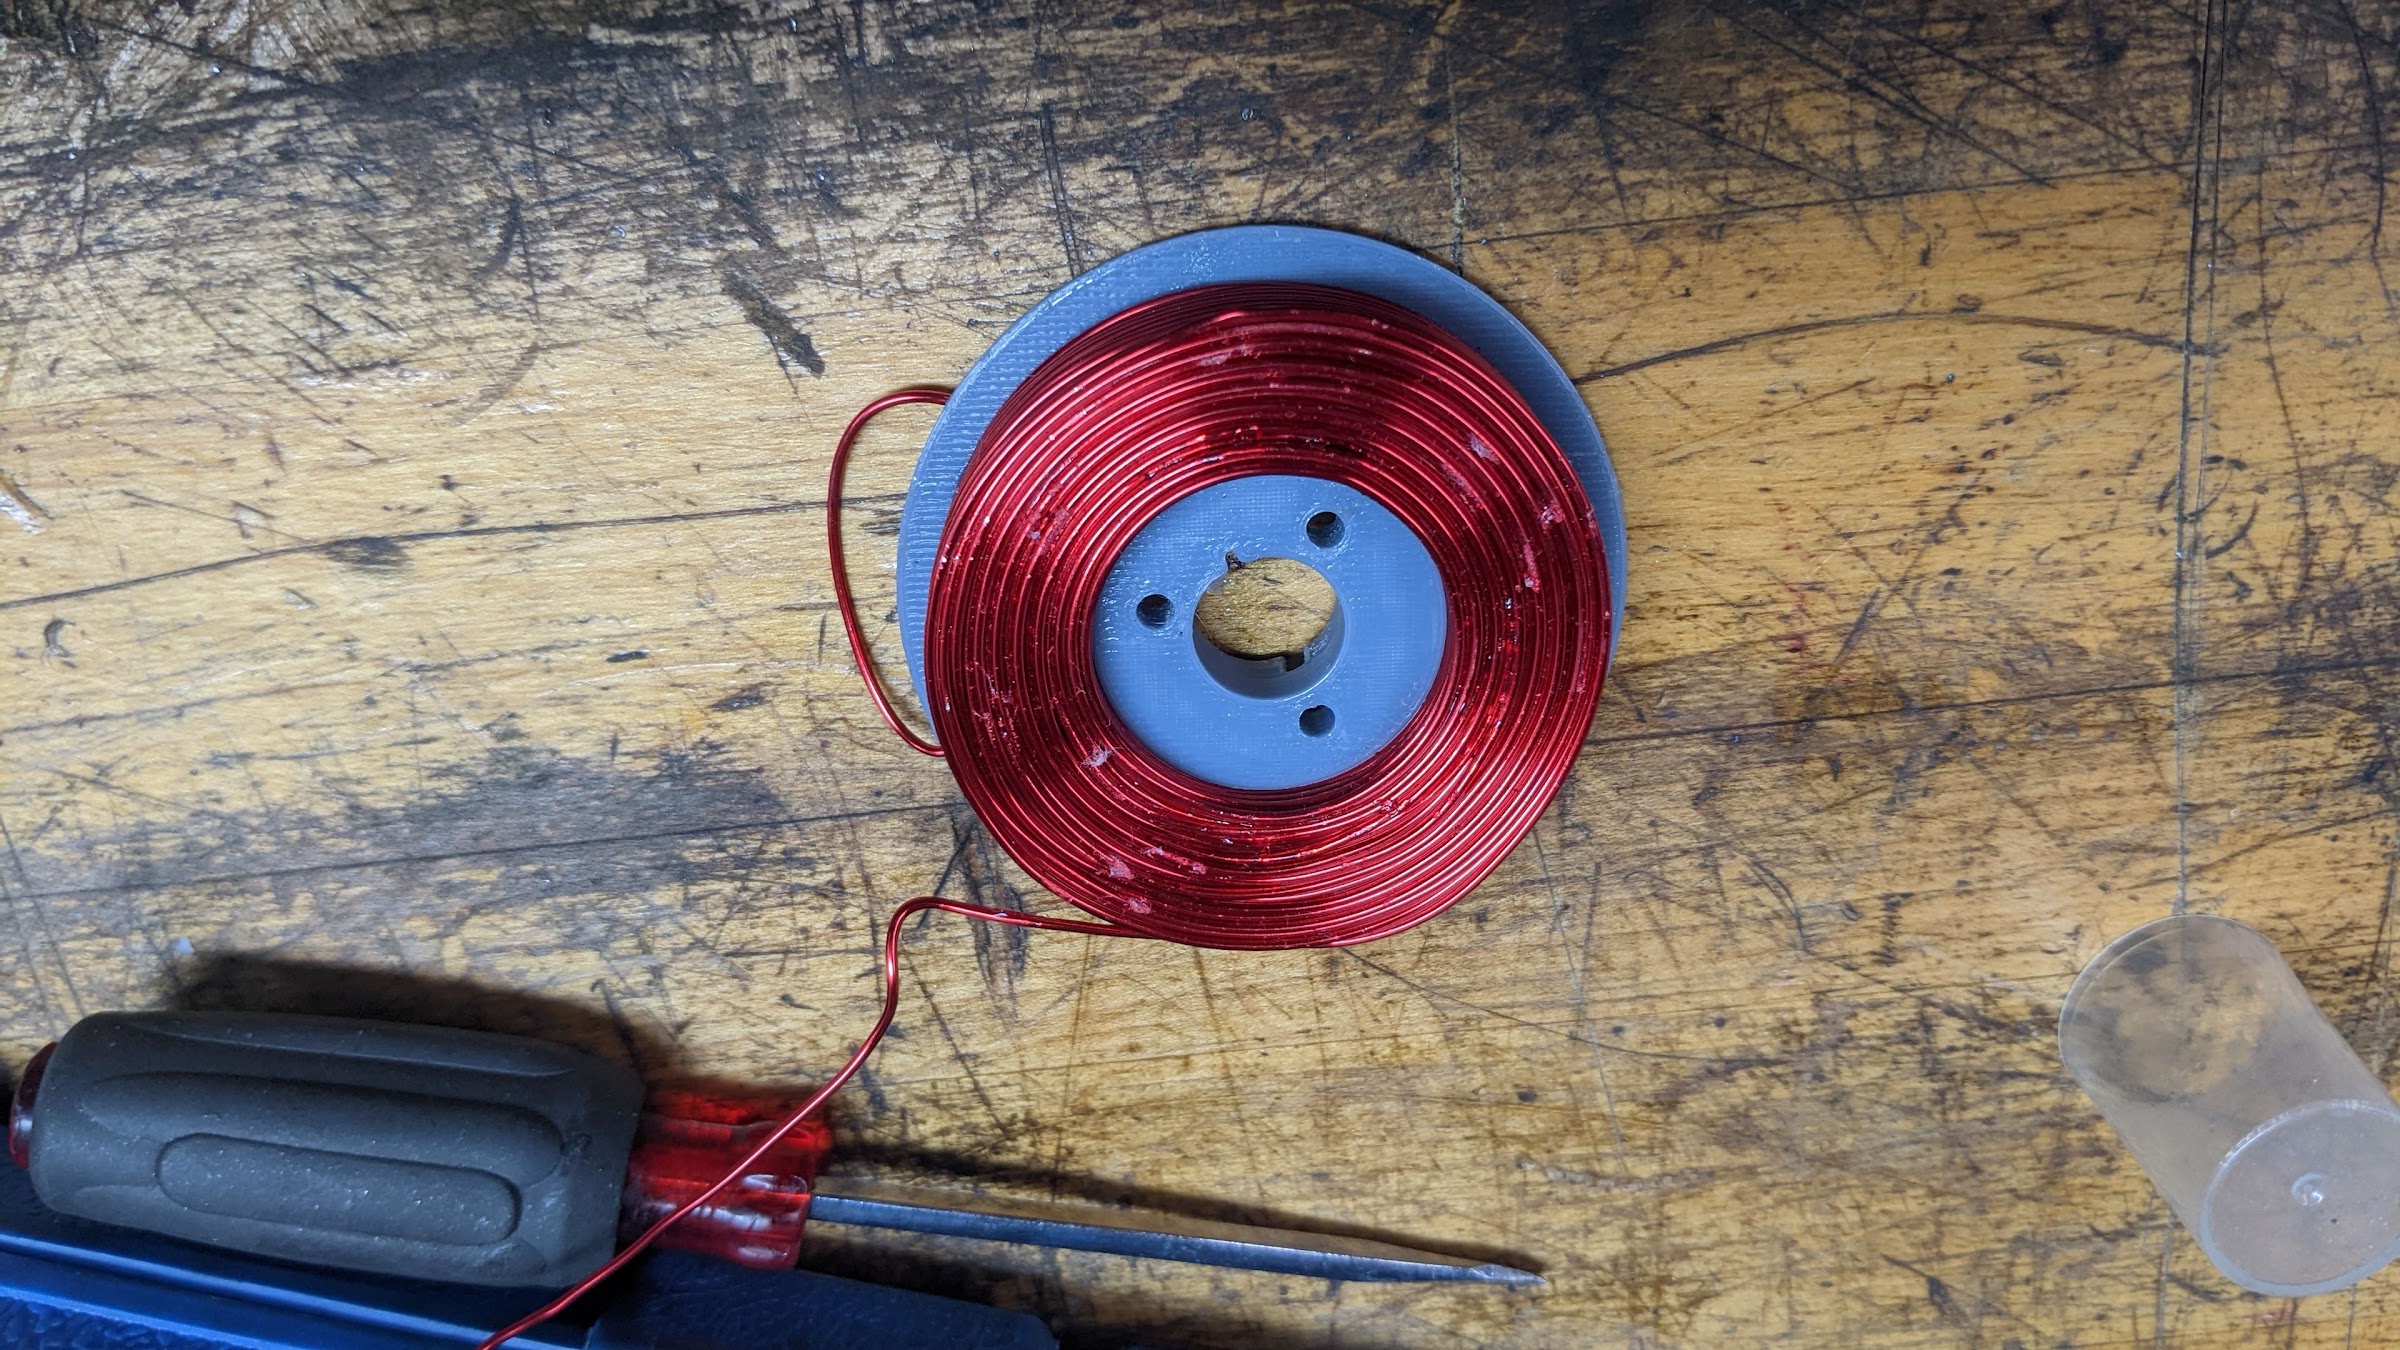

I've now made 8 in total, and only the last 4 are keepers. Since the last two are of a slightly different diameter wire, and also a different color, AND I'm getting good at making these, I'm going to make 2 more from this last spool of magnet wire, and then move forward.
While working on this over the weekend, the latest version of my press tool, that bends the coils into shape, failed. You can see the bulging in the picture below. Because of this, I was not able to get the coil "pringled" enough to snuggly fit into the stator. I will reprint the press tool in the same grey plastic I used before to see if it holds up better. Both were printed using a PETG plastic, but the black and grey came from different manufacturers.

That's it for now. I think I understand why there are four part numbers for these field coils on Salis, but I will share that thought later.
Cheers,
Andrew
This is a little off topic, but relevant to my slow progress. In the intervening weeks since my last update, I acquired a Victor 1630 metal lathe. I'd been looking for the "right" deal for over a year. The "right" deal meant the lathe had to be one of a small list of manufacturers, with good tooling, of the right dimensions/size, and with the ability to thread both SAE and Metric. This Victor met all the criteria. It came with a 3-jaw and 4-jaw chuck, a 5c collet closer, turns both metric and SAE threads and the price was really great. Here it is in my shop.
Just like a new (to me) bike, it requires a thorough going-over, changing the oils, leveling, cleaning, etc... This is my first lathe, so I'm coming up the learning curve.
Back to the field coils... I ran out of magnet wire and bought another spool, from another seller on Amazon, which is a different color and also a slightly different thickness (0.97 vs 0.93mm). I made two coils this weekend, which came out beautifully. My ability to create nicely shaped coils has improved.
I've now made 8 in total, and only the last 4 are keepers. Since the last two are of a slightly different diameter wire, and also a different color, AND I'm getting good at making these, I'm going to make 2 more from this last spool of magnet wire, and then move forward.
While working on this over the weekend, the latest version of my press tool, that bends the coils into shape, failed. You can see the bulging in the picture below. Because of this, I was not able to get the coil "pringled" enough to snuggly fit into the stator. I will reprint the press tool in the same grey plastic I used before to see if it holds up better. Both were printed using a PETG plastic, but the black and grey came from different manufacturers.
That's it for now. I think I understand why there are four part numbers for these field coils on Salis, but I will share that thought later.
Cheers,
Andrew
R69 R90/6 R100/7 R100S R1150GSA S2R1000
-
Werner1111
- Posts: 100
- Joined: Fri Dec 16, 2016 6:39 pm
- Location: Hollyweird, CA
Re: R69 (and other) field coil repair?
I reprinted the press tool with a denser fill and it worked. I was able to form the coils into the correct shape! I mounted the two latest coils into the stator as seen below.
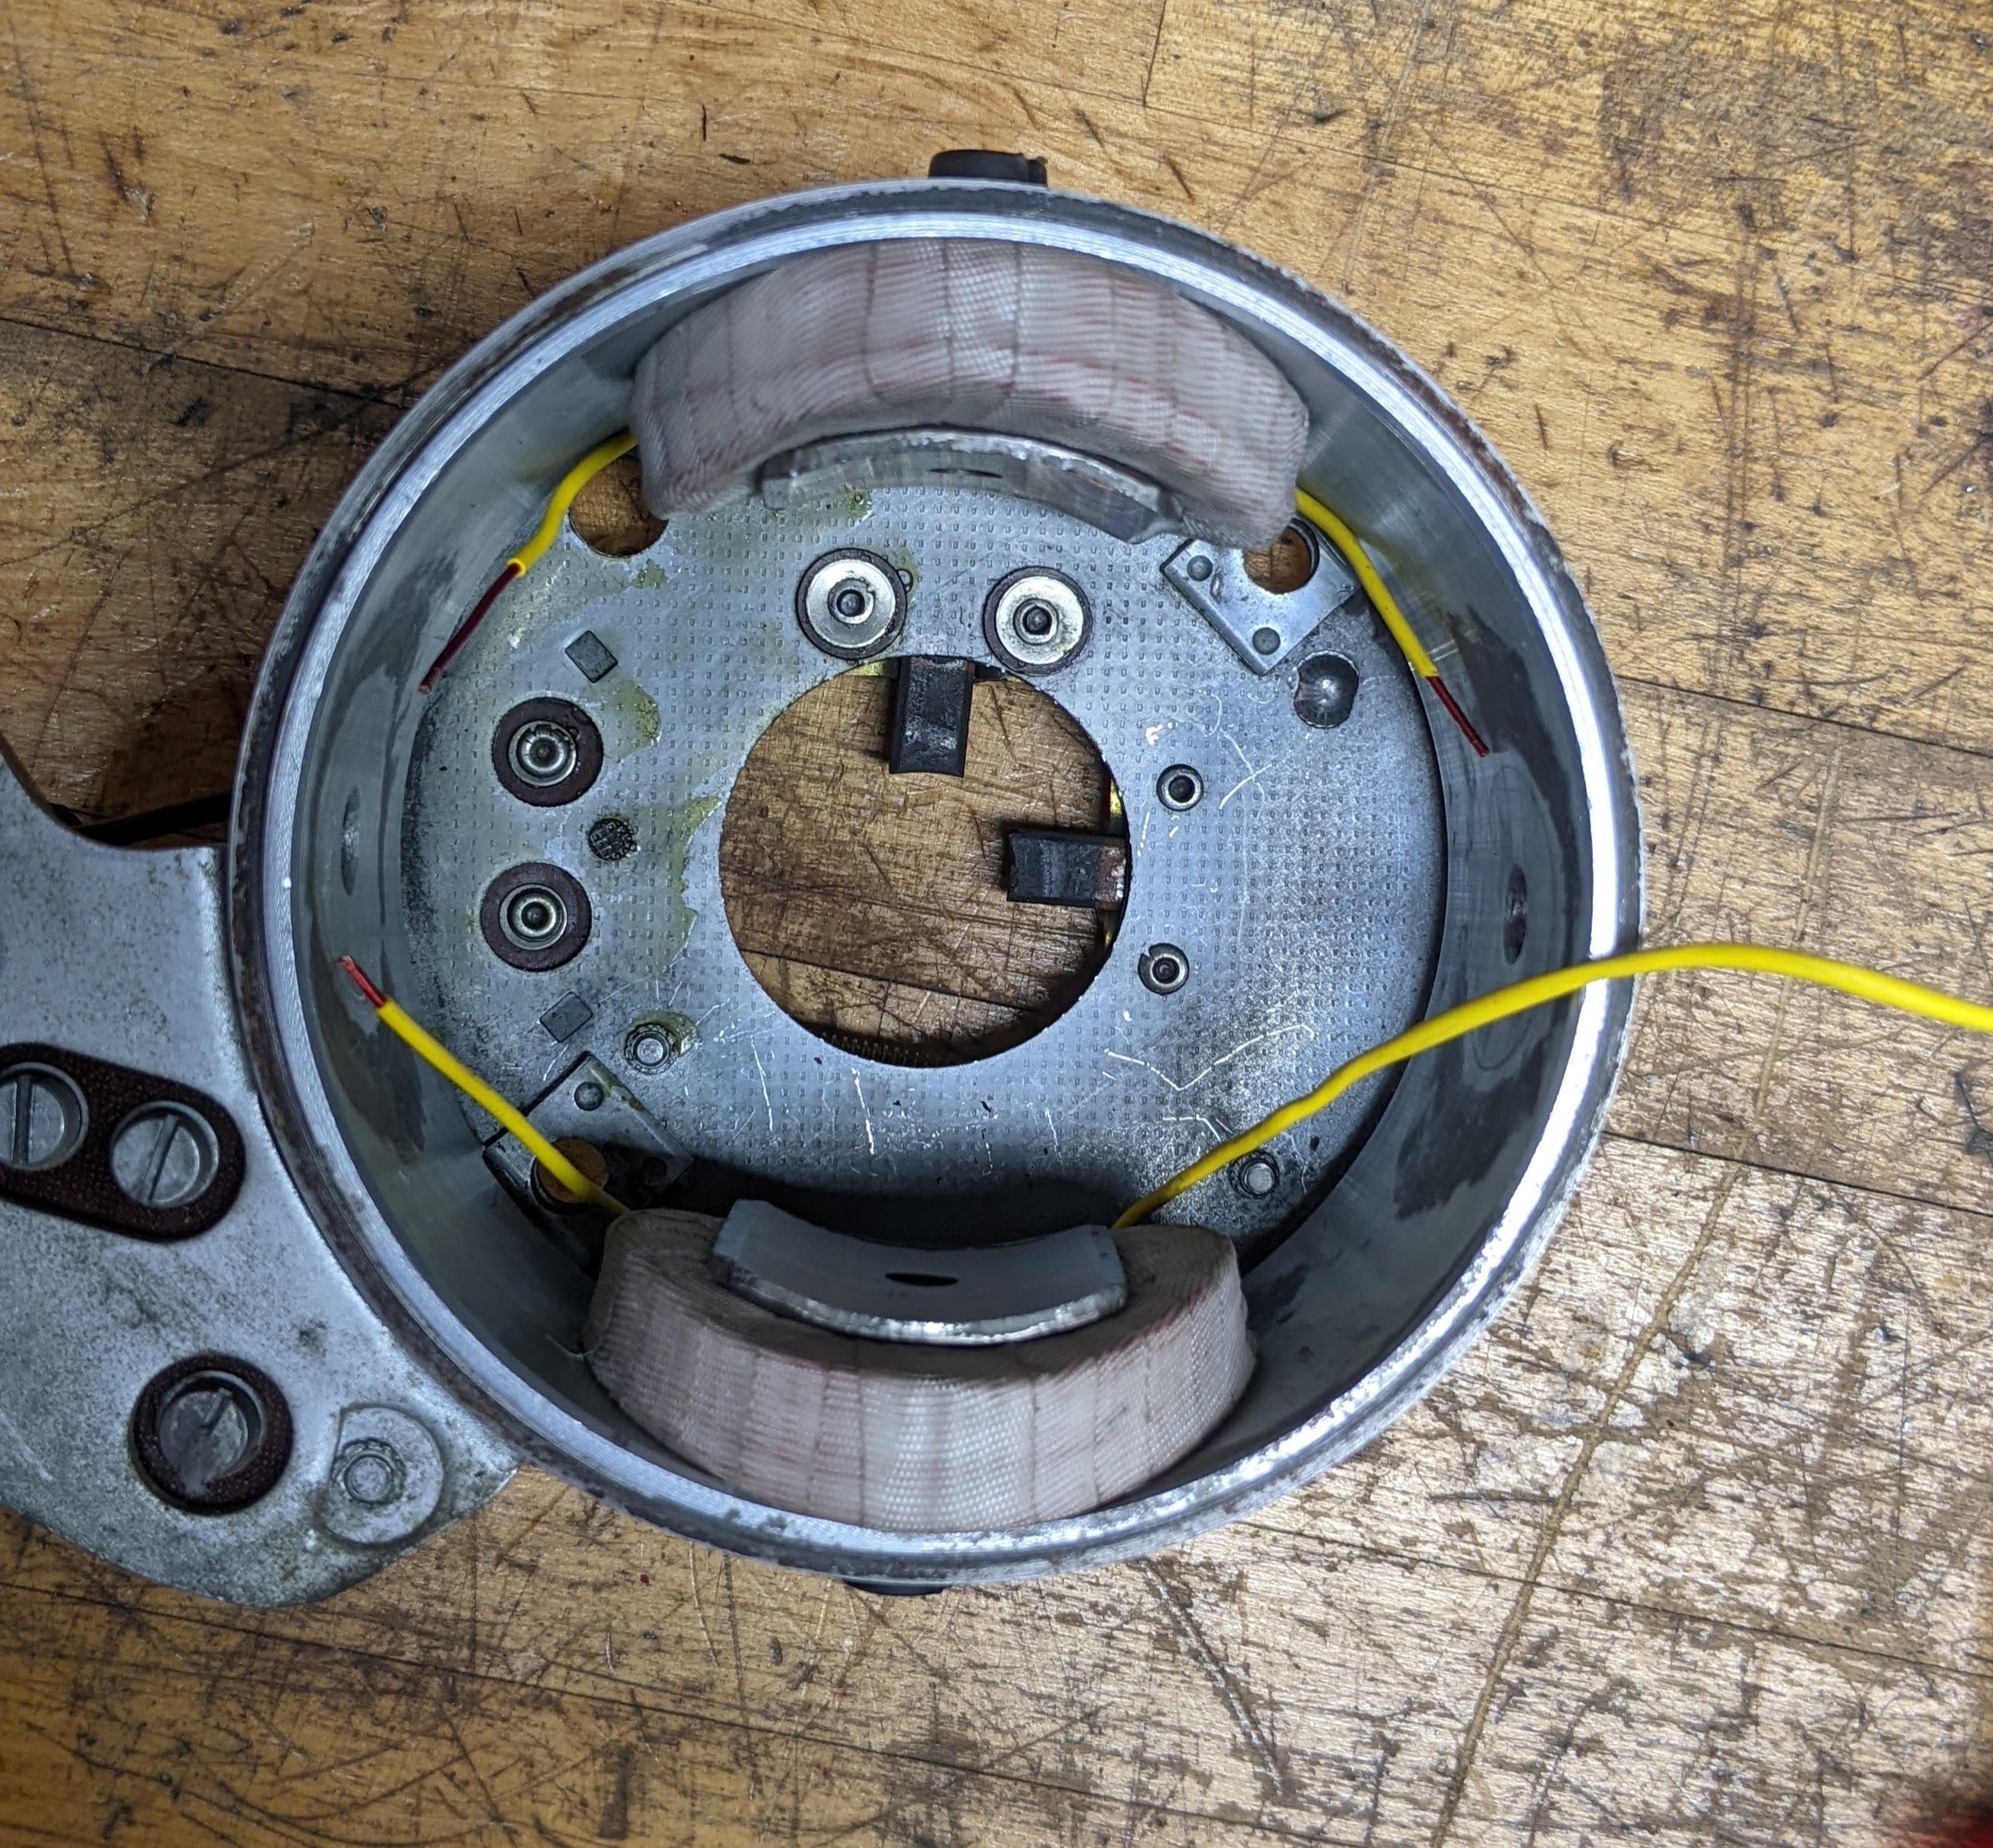
Only to find another point of failure in my plan... I tried to test fit, by hand, the rotor and check its clearance. The clearance is negative, meaning it won't fit. Ugh. The coil is too wide and the shoe can't completely snug up through the center of the coil to the stator body. Each side has about 0.45 mm of interference. The fit of the rotor is so tight that this little space makes a difference.
I looked at the original coils again and found that there are 9 wraps per layer (across the coil) and I have 10. If you look at the second to last picture in my last post, you will see the 10 wraps on the outside layer. So, I need to do it again with 9 wraps per layer. I'm a bit frustrated with myself for making this mistake. I did count the number of wraps and thought it was 10, but I think I need stronger glasses. I'm actually going to the optometrist on Thursday.
R69 R90/6 R100/7 R100S R1150GSA S2R1000
-
wa1nca

- Posts: 1234
- Joined: Thu Sep 27, 2012 5:15 pm
- Location: Ashfield Ma
- Has thanked: 13 times
- Been thanked: 18 times
Re: R69 (and other) field coil repair?
Looking Great
Like James said very informative topic
Previous Quote by Andrew:
I also hooked up my F-type Voltage Regulator to a variable DC power supply and ran it through its paces from 5V to 8V and back to 5V. While the two sets of points are opening and closing as I'd expect, the voltage that triggers the movement of the coil differs a bit each time, so I will need to address that issue as well.
I just built a variable power supply
My readings were consistence
If you voltage adjust is only a single turn pot it would be hard see a consistent value for voltage
I used a 10 turn precision pot to vary the coil voltage and readings were stable
Circuit breaker contacts engaged at 6.2 volts (2nd picture) to connect the battery/lights and then the regulator contacts engaged at 7.8 (1st picture) volts to lower the output voltage by shorting the field coils together
Tommy
- Attachments
-
-
Tommy Byrnes
54 R51/3, 55 R50/Velorex 560 sidecar, 64 R27, 68 R69US, 75 R75/6
Ashfield, Ma
USA
54 R51/3, 55 R50/Velorex 560 sidecar, 64 R27, 68 R69US, 75 R75/6
Ashfield, Ma
USA
-
Werner1111
- Posts: 100
- Joined: Fri Dec 16, 2016 6:39 pm
- Location: Hollyweird, CA
Re: R69 (and other) field coil repair?
That's really neat Tommy! What was your strategy for building it (i.e. do you just know how to do that, did you buy a kit, did you find a plan online?) It looks really clean. l Nice work.wa1nca wrote: ↑Wed Mar 02, 2022 5:09 pmI just built a variable power supply
My readings were consistence
If you voltage adjust is only a single turn pot it would be hard see a consistent value for voltage
I used a 10 turn precision pot to vary the coil voltage and readings were stable
Circuit breaker contacts engaged at 6.2 volts (2nd picture) to connect the battery/lights and then the regulator contacts engaged at 7.8 (1st picture) volts to lower the output voltage by shorting the field coils together
Tommy
I bought a variable DC power supply (Riden) at the beginning of the year, in order to more precisely troubleshoot the VR, and I am now able to vary the voltage by 0.01 V. Using it, the voltage at which the contacts move continually inches up over a 5 minute period. This is for my original F-type VR. It looks like you have the later Z(?)-type VR. I have a non-mechanical VR ready to install.
R69 R90/6 R100/7 R100S R1150GSA S2R1000
-
wa1nca
- Posts: 1234
- Joined: Thu Sep 27, 2012 5:15 pm
- Location: Ashfield Ma
- Has thanked: 13 times
- Been thanked: 18 times
Re: R69 (and other) field coil repair?
Just used a lm338 voltage regulator 0-30 volts, meter and recycled parts
The Riden power supply looks great
Static ohm readings of Z type regulator
picture of Z type regulator
Tommy
The Riden power supply looks great
Static ohm readings of Z type regulator
picture of Z type regulator
Tommy
- Attachments
-
-
Tommy Byrnes
54 R51/3, 55 R50/Velorex 560 sidecar, 64 R27, 68 R69US, 75 R75/6
Ashfield, Ma
USA
54 R51/3, 55 R50/Velorex 560 sidecar, 64 R27, 68 R69US, 75 R75/6
Ashfield, Ma
USA
-
Werner1111
- Posts: 100
- Joined: Fri Dec 16, 2016 6:39 pm
- Location: Hollyweird, CA
Re: R69 (and other) field coil repair?
I'm back after a week on the road for work.
Tommy, I'm impressed with your ability to set up a variable DC power supply!
I re-examined the old coils and they do indeed have 10 wraps per layer as I originally thought, not 9. So, what do I do? I tried compressing the entire coil between two pieces of wood to make it thinner, and then bent it back to the correct shape for installation. I'm still struggling to get the shoe to fully seat, which means the shoes interfere with the rotor.
My first roll of 19 awg had a diameter of 0.95 mm. The 2nd had a 0.93 mm diameter. The original is 0.89 mm. I did notice an improvement in fit between the 1st and 2nd rolls, but perhaps that was just due to having made so many coils. I'm going to try 20 awg magnet wire, instead of 19 awg.
I found some 20 awg wire with a stated outside diameter of 0.87 mm. The research I've done suggests it would usually be closer to 0.83mm, which is why I didn't try it the first time. I'm dealing with 0.2 to 0.4 mm in terms of interference between the shoe and the rotor. Using the 0.87 mm compared to the 0.93mm will give me (0.06mm/turn) x (10 turns per layer) - 0.6 mm of extra space x 2 (one for each opposing shoe) = 1.2 mm, which hopefully is enough. Or maybe I'm dreaming that I can benefit from such a small difference.
What a rabbit hole this is. I've been working on this for almost 3 months now, but I've come this far and can't give up. I'm stubborn like that. 20 awg wire should be arriving this Friday.
R69 R90/6 R100/7 R100S R1150GSA S2R1000