
My local BMW shop says they can fix my head. Haven't seen an estimate yet but I am hopeful. Also have the many-in-one kit coming and the restoration manual from Bench Mark Werks. Hoping to have the bike completely torn down this weekend and ready to start prepping for paint. My left rear shock and spring fell out when I took the rear swingarm off. It looks like the threaded part at the bottom stripped out or something. I included a couple pics. A little surprising.
2 questions:
Dave - I get the need for a torch and the oven but what do I need a hot plate for
Does anyone have any experience with Caswell's CAD kit
(my question mark and forward slash key doesn't work)
If you like our site, please consider joining our club!
By joining you will help ensure that we can continue to provide this service
JOIN HERE!
By joining you will help ensure that we can continue to provide this service
JOIN HERE!
Possible next project - my first /2
My local BMW shop says they
- Attachments
-
- 20171031_225751.jpg (3.85 MiB) Viewed 2374 times
-
- 20171031_225711.jpg (4.54 MiB) Viewed 2374 times
Bstratton
1971 R60/5
1965 R50/2
1982 Honda Goldwing GL1100 Interstate
MA
1971 R60/5
1965 R50/2
1982 Honda Goldwing GL1100 Interstate
MA
Hot Plate
A hot plate really helps when installing the crank and cam. After heating the crankcase in the oven to hopefully close to 300 degrees, I use the hot plate to set the bell housing end of the crankcase right down on. This keeps the rear crank bearing carrier and rear cam bearing cavity hot, and they need to be. Just watch putting too much heat on the rear main bearing once the crank is installed, and before the cam is in.
Dave
Dave
Dave

shocks
My left rear shock and spring fell out when I took the rear swingarm off. It looks like the threaded part at the bottom stripped out or something.Not sure that you have that big a problem here.
The shock damper has very fine threads where it screws into the lower shock-eye housing.
Still, they are capable of unscrewing over time due to the constant action.
Yours appears to have over-greased with anti-seize which may have promoted this result.
more on that here: http://www.vintagebmw.org/v7/node/10092
'61 R27, '63 R60/2 etc.
ignition switch
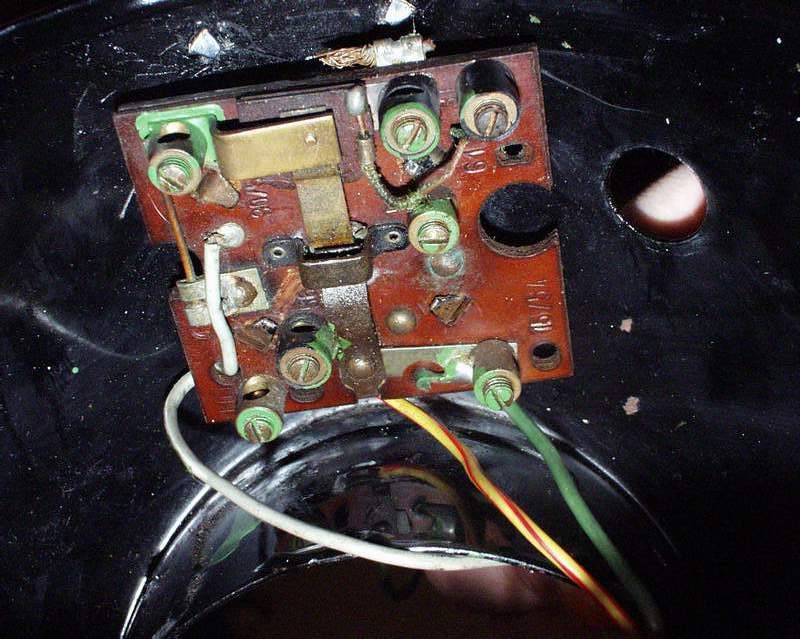
Bike is almost apart enough to start prepping for paint. I believe I will need to remove the ignition switch to get the ignition cover off the headlight bucket. Assuming the ignition switch on the /2 is held in the headlight bucket with folding metal tabs like the /5.... I forget if the tabs on the chrome cover hold the switch (lock) plate in or if there are separate tabs that just hold the switch lock plate ( think there are).
I have searched the forums and found a few mentions of this but not much. I remember once reading a conversation related to a way to reduce the risk of breaking the tab(s) but can't find it. Any advice would be appreciated.
Also, there is a red indicator lamp on the head of the steering where the handlebars attach. I am assuming it is an after market turn signal indicator as I can't think of anything else it could be. The bike has bar end hellas and after-market rear directionals.
Photo attached. can't figure out how to make it not sideways.
- Attachments
-
- 20171130_204555.jpg (4.11 MiB) Viewed 2374 times
Bstratton
1971 R60/5
1965 R50/2
1982 Honda Goldwing GL1100 Interstate
MA
1971 R60/5
1965 R50/2
1982 Honda Goldwing GL1100 Interstate
MA
The tabs holding the ignition
The tabs holding the ignition switch is the same as the /5s, and is a bugger to do, on the bike anyway.
Icarus
Icarus
Battery question
I was afraid of that. I got away with it on my /5. Easier with the bucket on the bench.
I am looking for a repro 6V battery but all I see are boxes that look like the original batteries. The kind that you would put a new (probably sealed) battery into. Sealed batteries are great for fire alarm panels with steady solid state charges but I don't like them in automotive applications. Thought I'd get in touch with Vech at Bench Mark but that's all I have.
I am looking for a repro 6V battery but all I see are boxes that look like the original batteries. The kind that you would put a new (probably sealed) battery into. Sealed batteries are great for fire alarm panels with steady solid state charges but I don't like them in automotive applications. Thought I'd get in touch with Vech at Bench Mark but that's all I have.
Bstratton
1971 R60/5
1965 R50/2
1982 Honda Goldwing GL1100 Interstate
MA
1971 R60/5
1965 R50/2
1982 Honda Goldwing GL1100 Interstate
MA

switch
Bike is almost apart enough to start prepping for paint. I believe I will need to remove the ignition switch to get the ignition cover off the headlight bucket. Assuming the ignition switch on the /2 is held in the headlight bucket with folding metal tabs like the /5.... I forget if the tabs on the chrome cover hold the switch (lock) plate in or if there are separate tabs that just hold the switch lock plate ( think there are).
I have searched the forums and found a few mentions of this but not much. I remember once reading a conversation related to a way to reduce the risk of breaking the tab(s) but can't find it. Any advice would be appreciated.
Also, there is a red indicator lamp on the head of the steering where the handlebars attach. I am assuming it is an after market turn signal indicator as I can't think of anything else it could be. The bike has bar end hellas and after-market rear directionals.
Photo attached. can't figure out how to make it not sideways.
For my restoration I had to rebuild mine as well. It was not fun and I spent hours on it. Since the harness was already on the bike I turned the headlight bucket upside down to finish the wiring and placement of the board. What a PINA it was. Just take your time. it will take a couple try's but you can do it. What ever you do don't loose the two small ball bearings.
This is what I used. For specific questions I called Vetch and he was very helpful.
This may help. http://w6rec.com/duane/bmw/ignkeys/index.htm
Edit ..... don't forget to heat the tabs before you move them. There is a specific term for it but I forgot. Sorry.
1966 R60/2, 1967 R69S, 1975 R90S, 2020 R1250GSA
-
schrader7032

- Posts: 9086
- Joined: Fri Oct 27, 2006 3:00 am
- Location: San Antonio, TX
- Has thanked: 3 times
- Been thanked: 40 times
The tabs become work hardened
The tabs become work hardened when they are bent a number of times. In order to return the metal to a more flexible state, it must be annealed. If I recall correctly, the tabs stick through the circuit board...here's a picture from Duane's site:
http://w6rec.com/duane/bmw/ignkeys/bmw_ ... witch6.jpg
So heating the tabs before removal is not a good idea. Only move the tabs enough to get the board out. Then once all is clear, use a fine heat source and heat the tabs to cherry red. There is a good chance that the paint on the headlight will be affected. Using a cold cloth on the bucket can help minimize that.
Kurt in S.A.
'78 R100/7 '69 R69S '52 R25/2
Fast. Neat. Average. Friendly. Good. Good.
'78 R100/7 '69 R69S '52 R25/2
Fast. Neat. Average. Friendly. Good. Good.
armature
Thanks for the guidance on the tabs. I will be re-painting the headlight bucket so the ignition cover needs to come off.
Now I have the motor on the bench. took the generator body off but can't get the armature off. Allen bolt came out easily enough but the armature is not cooperating.
Now I have the motor on the bench. took the generator body off but can't get the armature off. Allen bolt came out easily enough but the armature is not cooperating.
Bstratton
1971 R60/5
1965 R50/2
1982 Honda Goldwing GL1100 Interstate
MA
1971 R60/5
1965 R50/2
1982 Honda Goldwing GL1100 Interstate
MA
-
schrader7032
- Posts: 9086
- Joined: Fri Oct 27, 2006 3:00 am
- Location: San Antonio, TX
- Has thanked: 3 times
- Been thanked: 40 times
You need a special bolt to
You need a special bolt to "push" the armature/rotor off. Cycleworks sells this bolt...others might as well. It's a bolt about 6-7 inches long with the proper pitch threads. The first inch or so of the bolt has the threads machined off. It's possible to use a hardened bolt cut down or maybe an old drill bit of the proper size. This is stuck into the hole first and then the rotor bolt is put back in and pushes against the hardened bolt. The rotor will eventually pop off...be ready to catch it.
Whatever you do, use the right "tool" otherwise it might bend or become lodge in the nose of the camshaft. You won't have a good day if that happens.
Google "bmw motorcycle rotor removal tool" and look at the images that come up. The best info is on Snowbum's website.
Whatever you do, use the right "tool" otherwise it might bend or become lodge in the nose of the camshaft. You won't have a good day if that happens.
Google "bmw motorcycle rotor removal tool" and look at the images that come up. The best info is on Snowbum's website.
Kurt in S.A.
'78 R100/7 '69 R69S '52 R25/2
Fast. Neat. Average. Friendly. Good. Good.
'78 R100/7 '69 R69S '52 R25/2
Fast. Neat. Average. Friendly. Good. Good.