Hello Carl,I was expecting to take a few "years",however I seem to be ahead of schedule and probably will have it almost complete by the end of the year.I have all the parts now,and will be sending the body work to get painted & striped.I am doing 2 things that are "non-correct",basically the R-51 handlebars (lower & wider) as well as powdercoating the rims BLACK.It will look good IMO,we will see.
I sourced the rubber kit from bluemooncycle and there was a good kit,very comprehensive,albeit expensive.I also got a few pieces from benchmarkworks.\
Brakelight switch was from S.Meyer,however it is not identical to OEM,I would try a good used one or benchmark for a brake switch,.
Basically everything was purchased from benchmarkworks/S.Meyer/bluemooncycler/bluemoonscooter.I have yet to use Uli's.......I do like what they offer however.
Definitely get the "bolt guy"'s stainless steel fastener kit,it is GREAT!!
Luckily I have the R60 to drive,if not,I would be RUSHING to finish this.
If you like our site, please consider joining our club!
By joining you will help ensure that we can continue to provide this service
JOIN HERE!
By joining you will help ensure that we can continue to provide this service
JOIN HERE!
R69S restoration
-
808Airhead
- Posts: 1298
- Joined: Wed Aug 05, 2009 9:06 pm
- Has thanked: 21 times
- Been thanked: 20 times
Headlight Bucket
Well Powder coating the rims will make your bike something different, But I do remember reading an article about 2 guys also restoring a R60 and they powder coated the rims and from what I remembered they got compliments from other Vintage BMW bikers.
Question you said you will be sending your body work for paint soon? I am about to send my Frame / Body work for paint but I am worried about the headlight bucket.
How do you remove the circuit board without damaging the clips that hold it down?
I have seen a few topics about people suggesting heating up the point in order for them not to break but never heard of someone actually removing the board without any damage?
I will have to remove my Board as the inside of my Headlight bucket is a bit rusted and will have to be sandblasted and treated before any paint can come on.
So got any words of advice
-
808Airhead
- Posts: 1298
- Joined: Wed Aug 05, 2009 9:06 pm
- Has thanked: 21 times
- Been thanked: 20 times
Update; I have been busy so I
Carl,I am sorry,I totally spaced out on the reply,if you haven't already done the job,you can use a small motorcycle battery and heat up the prongs by touching them to each prong one at a time until they get red so they are annealed. (You can thank the Barrington manual for that tip)This will not disturb the paint if done correctly. Sorry again for the late reply.
Now back to business
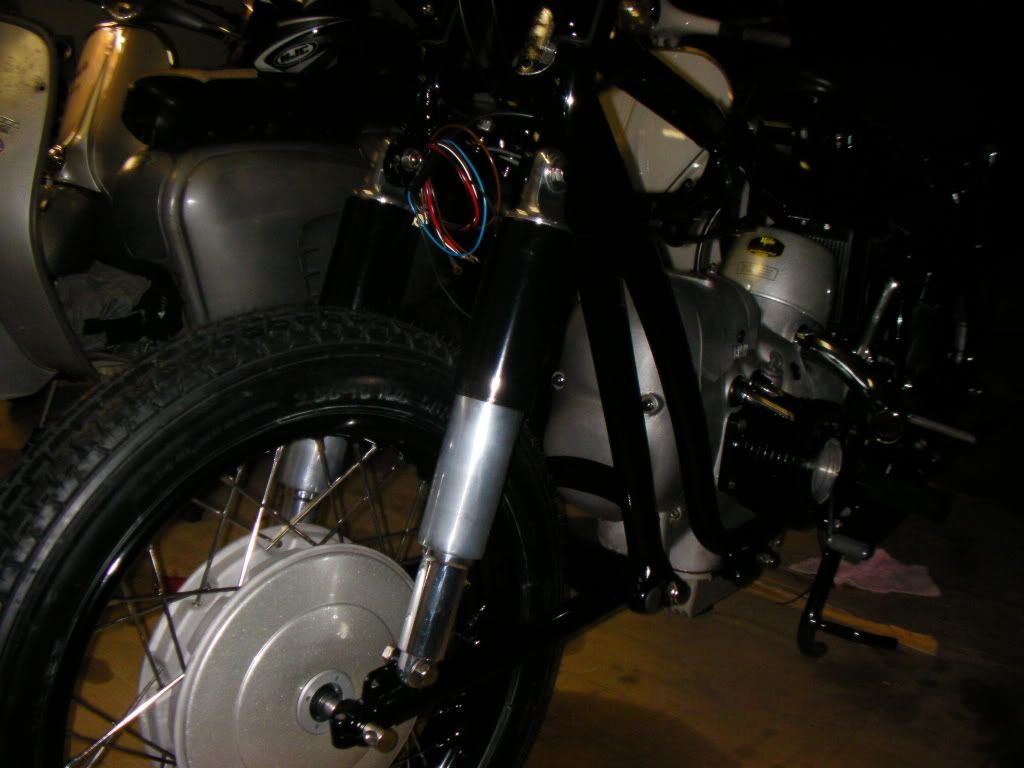
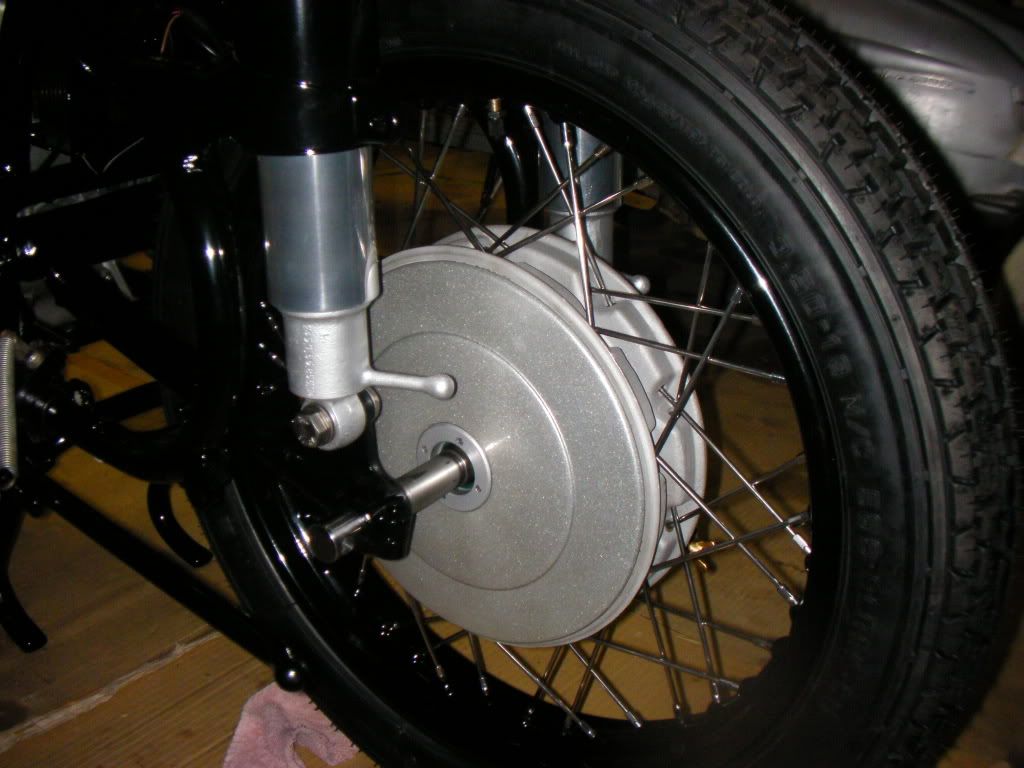
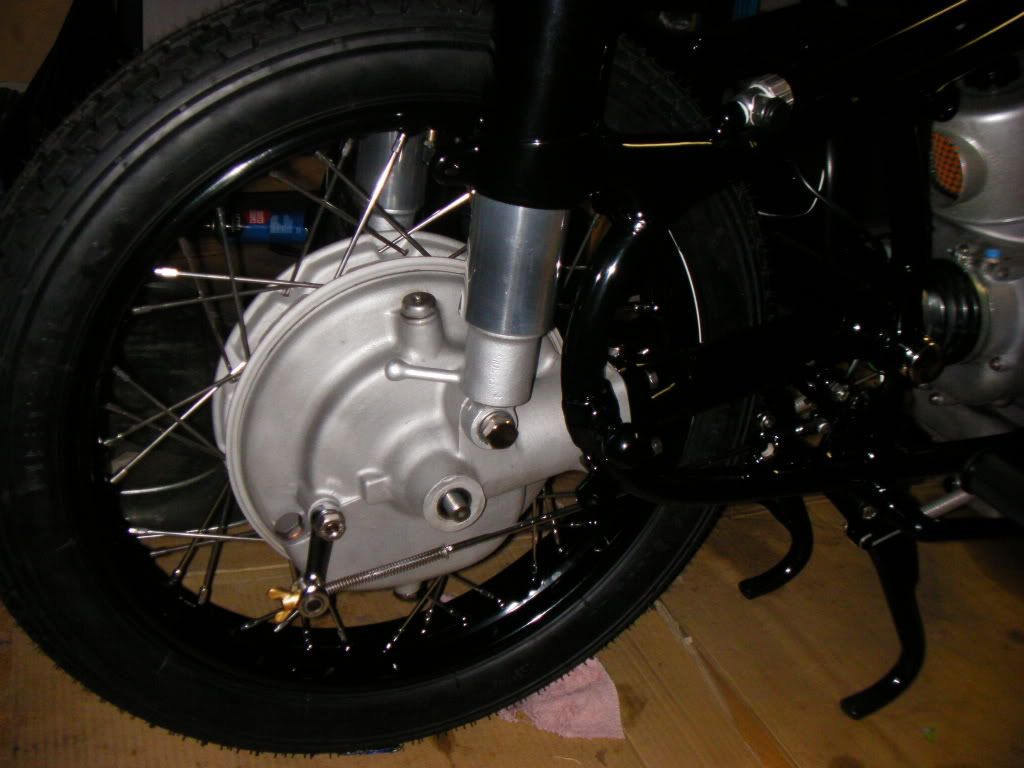
Update; I have been busy so I have only been able to squeeze small jobs in here & there on the bike,but it has now added up to some real progress. The original rims were powdercoated black (non-original,but I think it will look good,and the rims came with the bike and are original dimpled type)and with the stainless steel spokes & vintage Metzeler block C's ,I think they look great.
After inspecting the trans,I reassembled & soda blasted it,as well as installing all new seals/gasket. Fortunately gears and bearings were all immaculate & servicable,so I really lucked out on the trans. I was also able to polish the gear shift & kickstart levers,it is not professional looking polish,but this will be a rider.
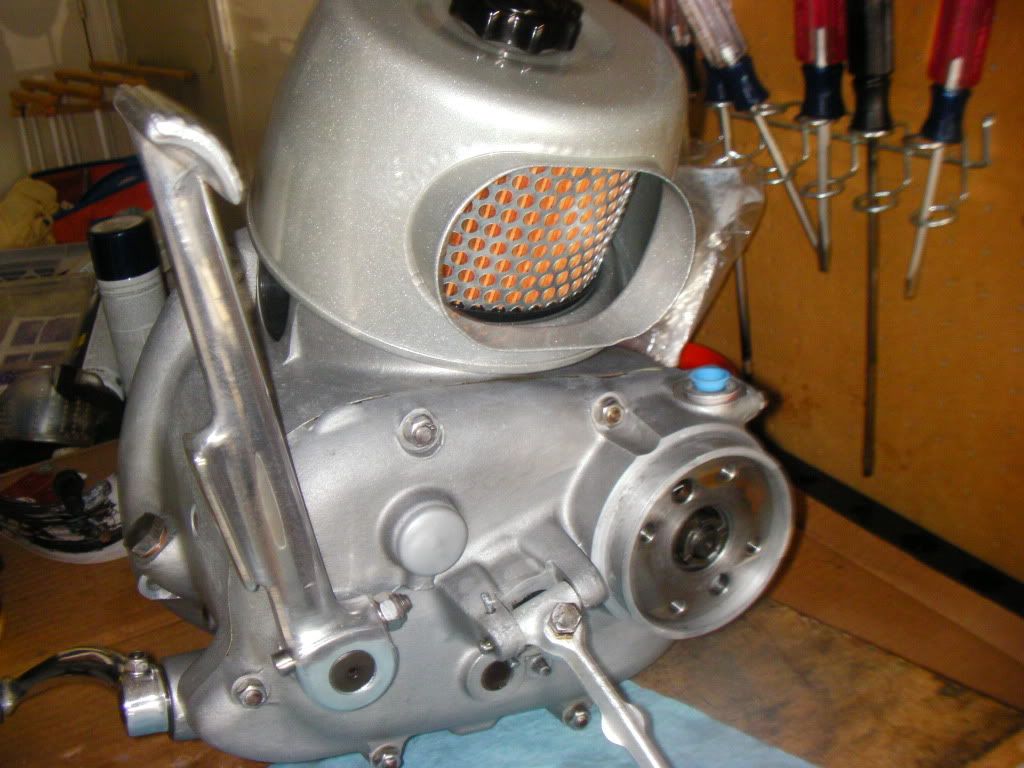
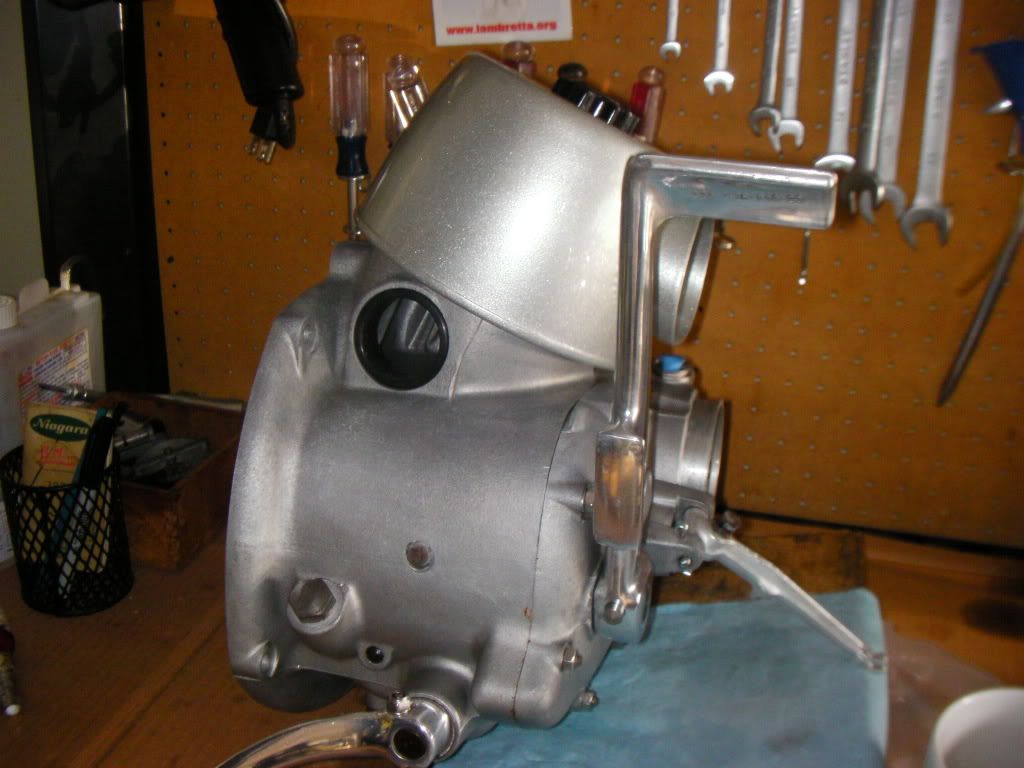
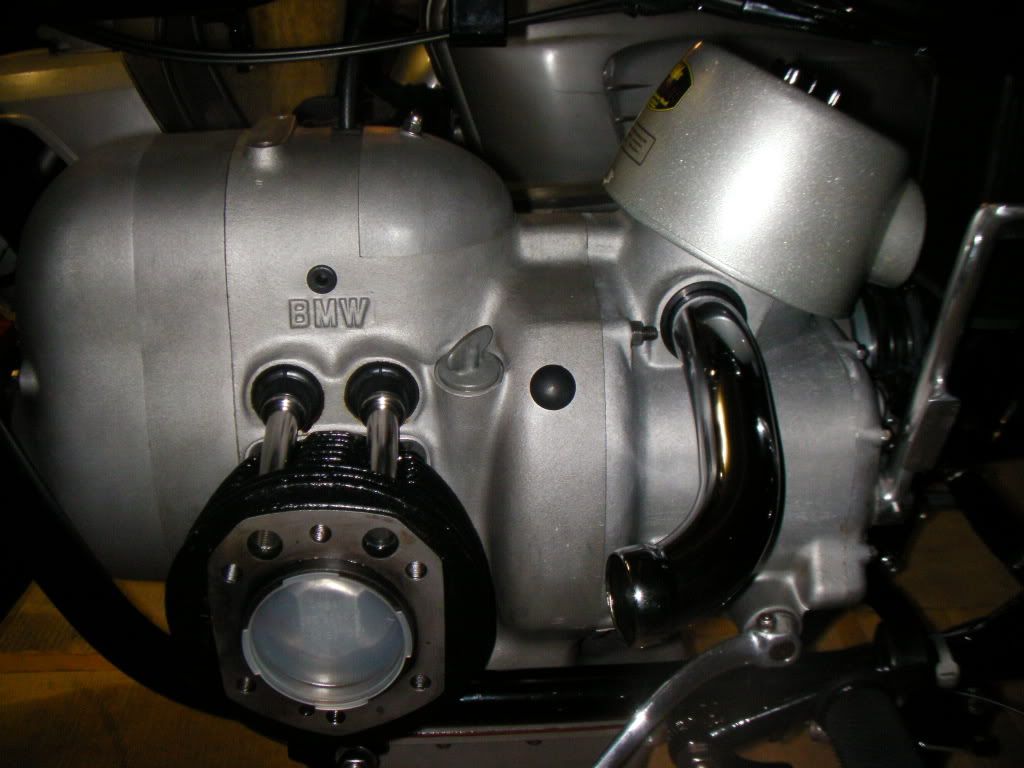
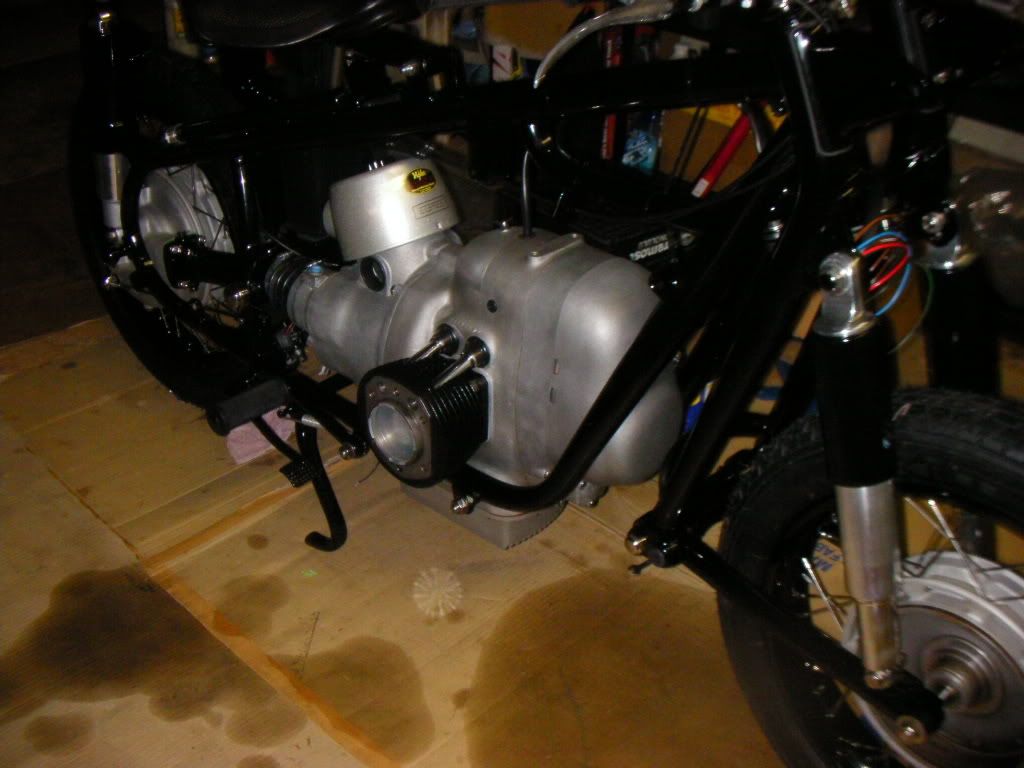
On the engine,a new complete repro clutch assembly was installed and that is what you will see in the first picture below.......

After wrapping the frame with strips of towel (you can also use elastic ankle wrap,thanks Barrington manual!!)I proceeded to install the engine using a low profile floor jack & a block of wood.Fortunately I wrapped the frame very well since I had to wiggle the engine in by myself and the reward was not a single scratch on the fresh powdercoat!
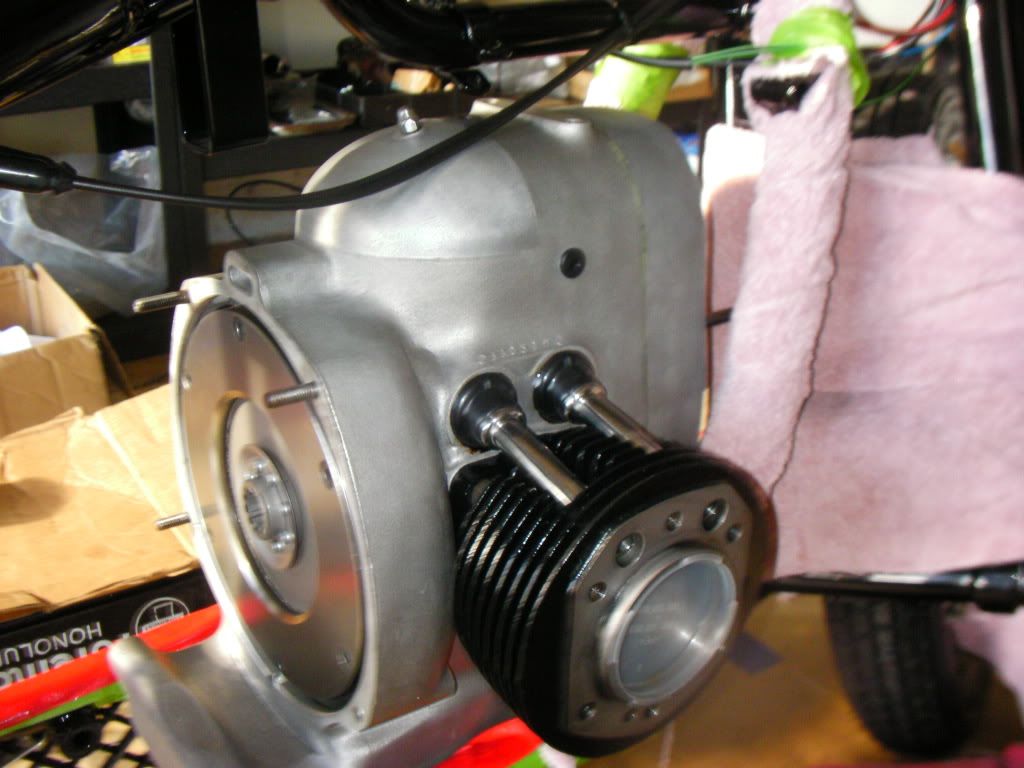
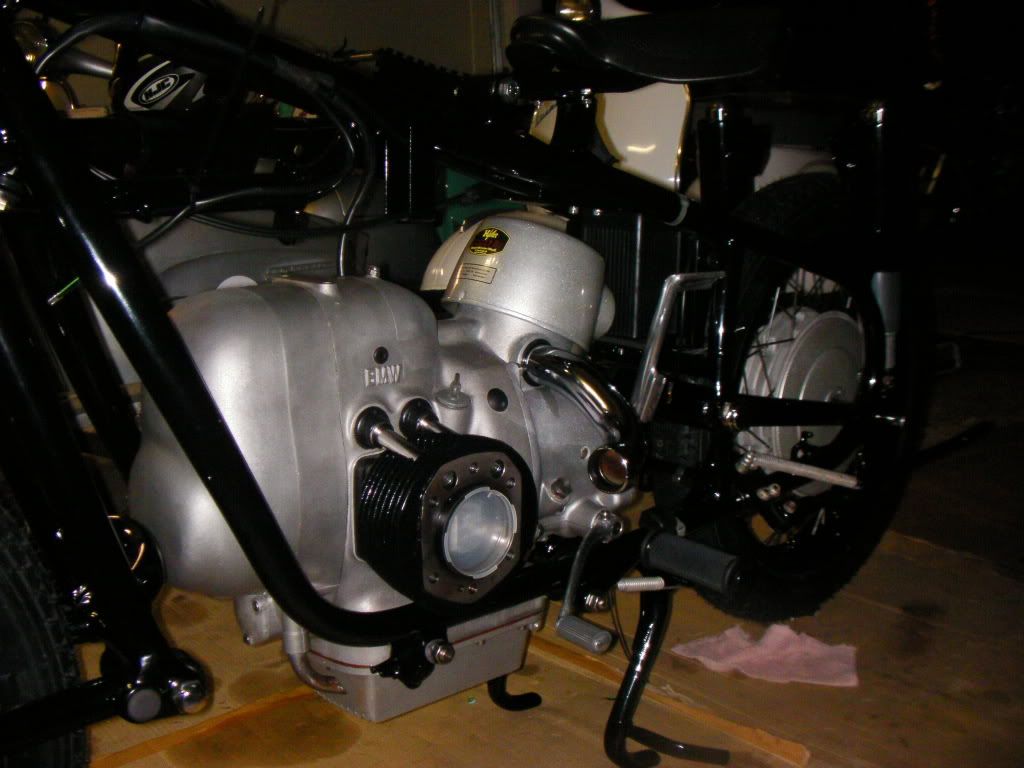
Here is the engine going in.
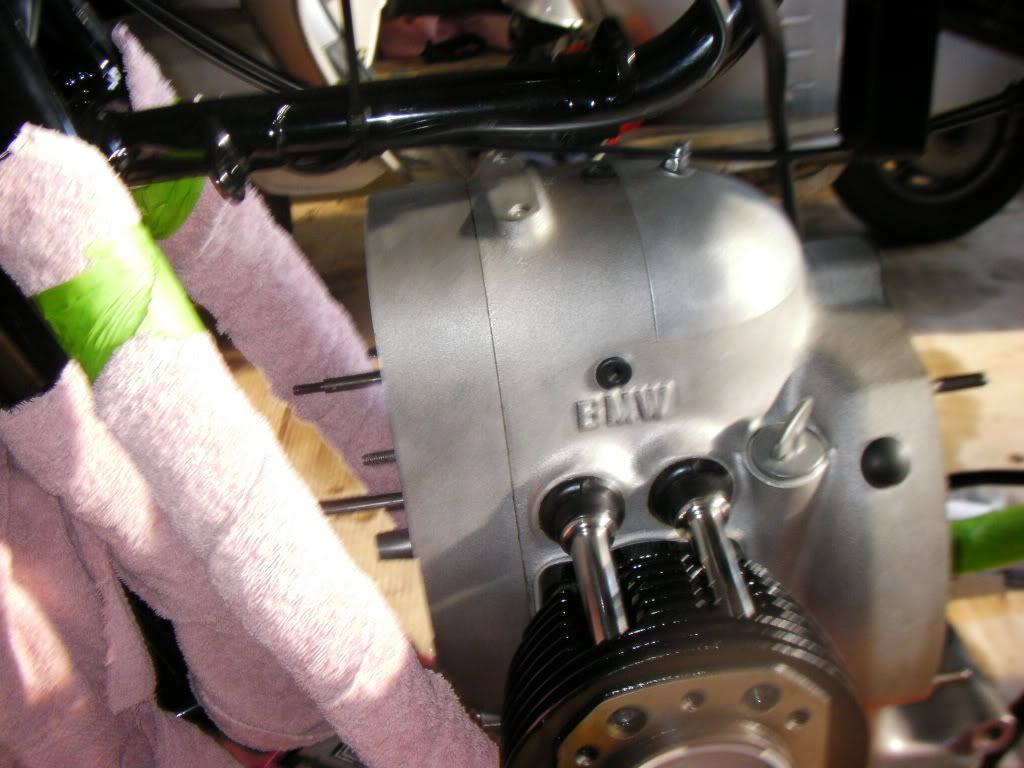
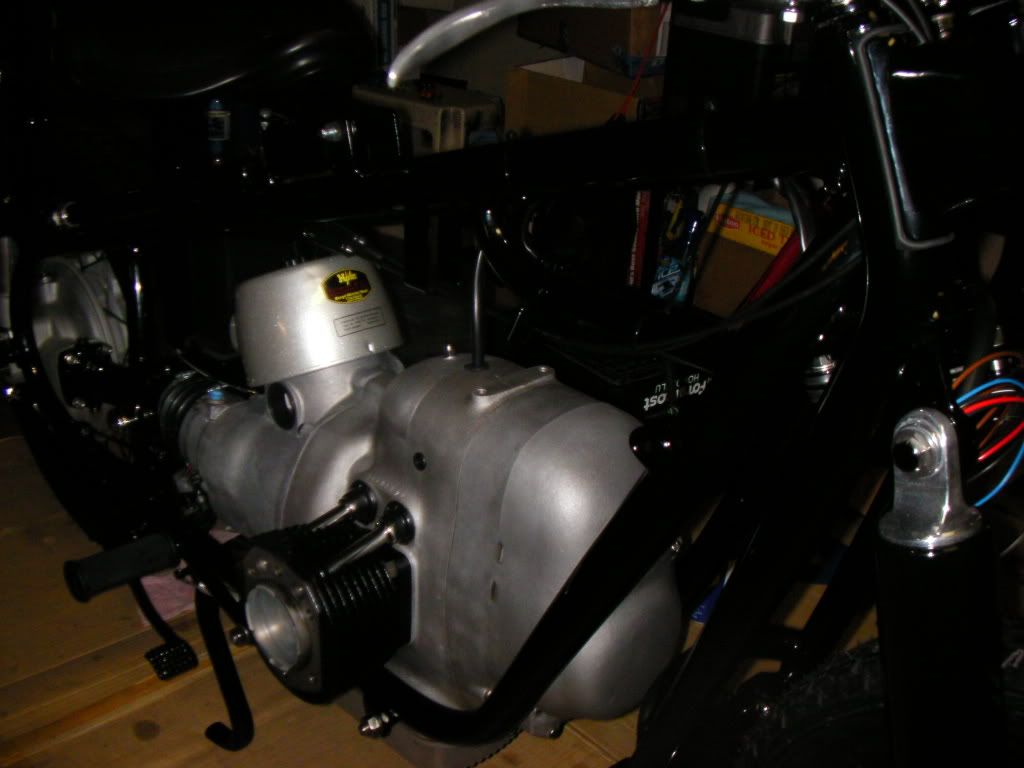
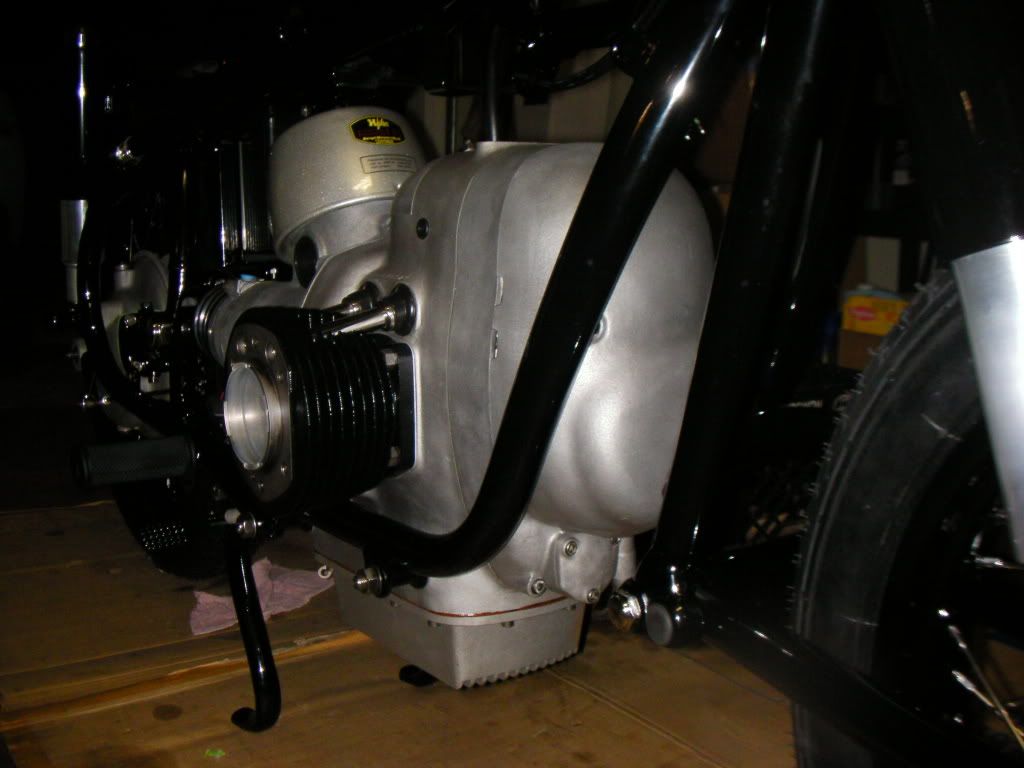
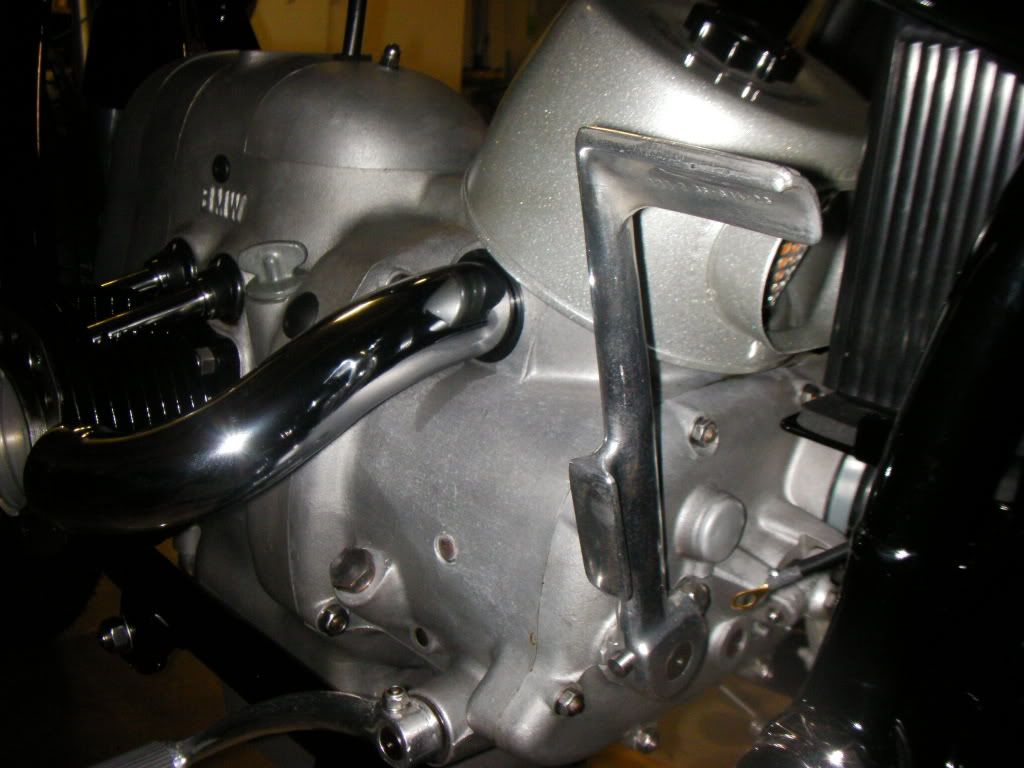
Here is a thing of beauty,the newly rebuilt engine & freshened up transmission......life is good.
You can see the black rims,I guess you either like them or you don't. SOme random shots of all the hard work.
 \
\
Just for fun,I stuck the chrome intake tubes in just to fire up the imagination
Here is the rear end with the stainless hardware,black rims and restored final drive
The body parts are getting single stage paint and hand pinstripe as we speak. It has been about a year and I cannot believe it is almost done!!
Now back to business
Update; I have been busy so I have only been able to squeeze small jobs in here & there on the bike,but it has now added up to some real progress. The original rims were powdercoated black (non-original,but I think it will look good,and the rims came with the bike and are original dimpled type)and with the stainless steel spokes & vintage Metzeler block C's ,I think they look great.
After inspecting the trans,I reassembled & soda blasted it,as well as installing all new seals/gasket. Fortunately gears and bearings were all immaculate & servicable,so I really lucked out on the trans. I was also able to polish the gear shift & kickstart levers,it is not professional looking polish,but this will be a rider.
On the engine,a new complete repro clutch assembly was installed and that is what you will see in the first picture below.......
After wrapping the frame with strips of towel (you can also use elastic ankle wrap,thanks Barrington manual!!)I proceeded to install the engine using a low profile floor jack & a block of wood.Fortunately I wrapped the frame very well since I had to wiggle the engine in by myself and the reward was not a single scratch on the fresh powdercoat!
Here is the engine going in.
Here is a thing of beauty,the newly rebuilt engine & freshened up transmission......life is good.
You can see the black rims,I guess you either like them or you don't. SOme random shots of all the hard work.
\Just for fun,I stuck the chrome intake tubes in just to fire up the imagination
Here is the rear end with the stainless hardware,black rims and restored final drive
The body parts are getting single stage paint and hand pinstripe as we speak. It has been about a year and I cannot believe it is almost done!!
Thomas M.
R69S - R60/2 - R67/2 - R51/3 - R69
R69S - R60/2 - R67/2 - R51/3 - R69

Black rims?
Black rims?
[h3]Jeff Dean
Friend of the Marque, Co-Founder VBMWMO (1972)
http://bmwdean.com --- http://bmwdean.com/slash2.htm[/h3]
[img]http://bmwdean.com/r75-200.jpg[/img]
Friend of the Marque, Co-Founder VBMWMO (1972)
http://bmwdean.com --- http://bmwdean.com/slash2.htm[/h3]
[img]http://bmwdean.com/r75-200.jpg[/img]
-
808Airhead
- Posts: 1298
- Joined: Wed Aug 05, 2009 9:06 pm
- Has thanked: 21 times
- Been thanked: 20 times
Yes,my personal touch It
Yes,my personal touch  It also has R51/3 handlebars which are lower/wider. This is a resto/rider,but not going for concourse resto...main thing is I like it.
Thomas M.
R69S - R60/2 - R67/2 - R51/3 - R69
R69S - R60/2 - R67/2 - R51/3 - R69

Black rims make the tires look fat
Visually, I think the black rims throw off the balance of the wheel size compared to the rest of the bike. It gives the bike a fat tire look.
I'm hoping you don't take this as a criticism of your restoration. Your restoration looks amazing in my eyes.
I'm hoping you don't take this as a criticism of your restoration. Your restoration looks amazing in my eyes.
'62 R69S
'65 R50/2
'76 R90/6
'65 R50/2
'76 R90/6
-
808Airhead
- Posts: 1298
- Joined: Wed Aug 05, 2009 9:06 pm
- Has thanked: 21 times
- Been thanked: 20 times
Zeno,thanks for the
Zeno,thanks for the comments.I totally agree with you that it gives it a big tire look. I really like it,I almost wish I painted the spokes as well,but that is too much trouble. I did it since it really gives it a vintage/older style IMO. When it is finished I think it will look great with the body work,etc.....I saw another /2 with black rims and realy liked it,so it inspired my bike.
Thomas M.
R69S - R60/2 - R67/2 - R51/3 - R69
R69S - R60/2 - R67/2 - R51/3 - R69
Great job on the restoration.
Great job on the restoration. I really like the black rims too.
I am just getting started on a '50 r25 restoration (my first, although I have been working on all things mechanical for 25 years). I have a few questions I hope you can help with. My restoration so far appears to be mainly cosmetic and if possible I am going to try and avoid tearing the engine all the way down. For the various parts what's the best way to bring back their luster? Ie. engine cases, trans case, etc. you mention soda blasting. I picked up a sand/bead blasting enclosure is it just a matter of using soda instead of the beads? For the other parts that require chrome are you just using a local chromer? Anything to look out for and what condition do the parts need to be in when delivered for chroming. Approx cost for chroming?
Thanks!
Jon
-
808Airhead
- Posts: 1298
- Joined: Wed Aug 05, 2009 9:06 pm
- Has thanked: 21 times
- Been thanked: 20 times
Thanks,and glad you can see
Thanks,and glad you can see the beauty in the black rim look
Congratulations on your new project. When you are talking about a "cosmetic resto" that would only be a good idea IMO if the bike is otherwise perfect mechanically. They are really a pleasure to work on,and I enjoy doing the work (except when it gets difficult of course!) .Definitely take the motor out and inspect/refreshen it and at the same time if you are going through the trouble of painting it,you might as well check out the bearings in the swingarms/wheels/fork stem/and while you are there inspect the clutch,etc,......you know what I am getting at!
Even if the bike is low mileage original,the grease still is congealed in the bearings,and sludge in the motor..so if you
like mechanical things,it will be rewarding in the long run to work on.
For the soda blasting,I did it outdoors and it is OK if you want a natural finish,however it is not agressive so it has to be in pretty good shape to begin with,here is a link to my soda blasting on the engiine,you can see if this is what will work for you.
http://www.vintagebmw.org/v7/node/6049
Yes the chrome is locally done and they did a great job on my intake tubes/braker parts/risers,but a very lackluster job on the R69s rims, however I ended up using them on my R60/2,as "rider rims"so I am not disappointed since the bike has patina.
Here are pics of those rims on my other bike,they really made it look nice especially since it had rusty spokes/rims before.
http://www.vintagebmw.org/v7/node/6655
The old R60/2 rims I had powdercoated and these are in the pics. Unfortunately there is only 1 chrome shop in Oahu so I figured just use powder coat these rims and if I don't like how they look I will buy new SS ones....
Good luck and have fun.Uli's online store has a "hop up" kit for the singles and it looks nice,check it out.
Thomas M.
R69S - R60/2 - R67/2 - R51/3 - R69
R69S - R60/2 - R67/2 - R51/3 - R69