(Archived from Peter Ardren’s vintagebmwbikeservice.co.uk site)

Please don’t read this post in isolation – unless you have worked methodically through the possible causes of split timing ( as outlined in my previous posts) then it is possible that you will not get satisfactory results.
Wow, I’d planned on dealing with differential timing in just one post. This is now the fourth. I guess it just shows how something as apparantly simple as a flickering flywheel mark can be caused by a whole mass of possibilities.
But here we are, with the timing gear cover back on, two new oil seals installed and zero run-out at the end of the camshaft taper. No problems there then but there are two items still to add and either (or both) can create your problems. And both are prime culprits.
Next job is to fit the rotor and time the magneto to it. For the sake of brevity I’ll not give details here – I’ll write this up in a later post. In the meantime, there are plenty of places where you can check how to do it if you’re unsure.
At this stage I wouldn’t fit the auto advance mechanism – just use the bolt from it to secure the rotor in place, but don’t over-tighten. Now you need to check whether there is any run-out at the end of the rotor shaft. It should be completely free – even the slightest deviation will cause split timing. If there is some run-out then you might want to adopt Duane’s technique to try to re-seat the taper but I HAVE NEVER KNOWN THIS WORK!!!! Most of us just don’t have Duane’s skill with a hammer. Besides, if you’ve taken the trouble to lap the tapers in, as described in a previous post, the rotor will automatically seat itself correctly.
In every case I’ve come across. the run-out has been caused by a slightly bent rotor shaft. Even .01mm run out will cause big differences between the timing of the two cylinders. But the rotor has soent all its life with relatively light axial pressure to keep it seated on the taper and neglidgeable radial pressure as the cams open thepoints. So how the hell could it have got bent? Simple – because some daft pillock in the past has taken a bloody great hammer to it in an attempt to cure the split timing without first finding out the cause.
What to do if the shaft is bent……? Buying a new or reconditioned rotor is really your only option here. This was an easy matter a few years ago but now reconditioned rotors are no longer available in Europe. New rotors are in very short supply also. I found a supplier last year and was very disappointed by the quality. Even when brand new the shaft had run out and was not securely connected to the magnets. There is good news though: Mark Huggett tells me that he will very shortly have some more in stock and I’ve no doubt that these will be of good quality. The price? I’ve no idea. Mark’s stock is usually more expensive than that of his competitors but we all know you get what you pay for.
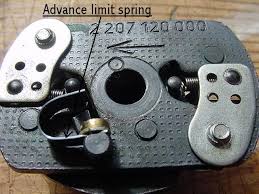
At this stage let’s assume that your original rotor is perfect or you’ve bought a good quality, new rotor. The magneto has been timed and the rotor sits squarely on its taper. There is zero run-out. It’s now time to fit the auto-advance mechanism and check for differential timing. You can’t of course, use a dial gauge to check for run-out because the advance unit has cams and you will get large deviations. It’s possible to check that the deviation for each cam is equal but it’s far more useful (and easier) at this stage to check that the points are opening at exactly the same point in the cycle for each cylinder.
You haven’t, at this stage, bothered to time the ignition so it doesn’t matter if the ignition timing is out – only that it is out by an equal amount for each cylinder. With an Allen key in the crankshaft turn the crank clockwise so that the timing unit is travelling in an anti-clockwise direction as you look at it. Turn it until it the F mark is somewhere within the window. It doesn’t matter where – it’s just an indication that now you need to slow down and turn the crank towards the S mark until you know EXACTLY where the points are opening. Some people use the old Rizla paper for this; some use the finest feeler gauge they have. But to do it really accurately you need to use an electronic measuring device such as an Ohm meter or, best of all, one of the buzz boxes that Vech sells. They’re arguably too pricey for the rare occasions on which most people will use them but they really do make timing a doddle.
You need to record the exact moment that the points start to open. I use a pencil mark on the flywheel to do this. It will almost certainly be within a centimetre on either side of the S mark.
Next, you need to do exactly the same for the other cylinder. So the flywheel has to turn through 360 degrees. At this point the second cam on the timing unit will start to open the points. Note where this is – it should be in exactly the same place as for the first cylinder.
If it is, that’s great. Go ahead and properly time the ignition. The job’s done.
If not, then you have a faulty ATU. It’s not surprising – these are all 60+ years old and have led a hard life. Assuming that the springs are pulling the cams back properly then one of the cams has worn more than the other. The ATU needs to be replaced.
Problem – there are some VERY poor quality ATUs available on the market. One supplier even advises customers to be prepared for rapid wear unless the cams are liberally lubricated ( oil flying around in a magneto is not to be advised if you want to keep a big fat spark without cleaning the points every hundred miles or so)!!
My advice again would be to buy from Mark Huggett if you’re Europe based. Buying cheap is buying trouble here!
As an appendix to this, there IS something that can be done to reclaim worn ATU cams. I don’t recommend it – buying new is far the best option – but I’ve done it for two of my clients who had paid HUGE sums to cure massive engine problems. Quite simply, they couldn’t afford the expense of buying a new ATU as well.
I’ll post about this, emergency, method in a month or so.


