By joining you will help ensure that we can continue to provide this service
JOIN HERE!
Old Dirty R69 - From Basket to Bike
Kick Stand Shenanigans
So, going over the frame, things seem good. A little surface rust, but no major damage. But the kick stands - oof. The post for the side stand was broken off flush with the mount, so I had to drill and retap for a larger size post - pretty common so I'm told. The centerstand that was with the bike was an absolute abomination - at least 2 inches too short, and mangled in addition to that. Once I got a new one, I got a taste of how bad the mounts were. They were salvageable, but not without heating and adjusting and a modest amount of welding. On one side I actually added some 1/8th inch plate to build the area back up and hopefully add a bit more strength.
International Shipping
I feel like I've turned a big corner and the more enjoyable build process is beginning. Already a little cocky...
- skyler.robbins
- Posts: 228
- Joined: Sat Sep 22, 2018 4:14 pm
Wow...
Great quality pictures to boot..
Thank you again for the details.
Those Damn Slingers
The obligatory slinger servicing was on the to do list of course and I may have talked to friends and neighbors about this aspect of these bikes more than any other. In my research and conversations, I thought I would be tricky and "upgrade" the slingers to r69s. Little lesson learned here - they do not fit. The slightly deeper lip, which is why I thought I wanted them, interferes with the bearing carrier by just a tiny bit. We are talking a couple thousandths probably. So, to anyone working on an r69 - the r69 and r69s motors have a few subtle differences and cannot always interchange parts. To be honest, in the back of my mind I thought this might be true and these slingers were the only place I tried using a later model part #. Lesson learned, don't do it.
Old below - new on top. You can sorta see the difference...
Instead of ordering another set - I decided to service my old ones. Made this little scraper tool in about 5 min and it worked like a champ.
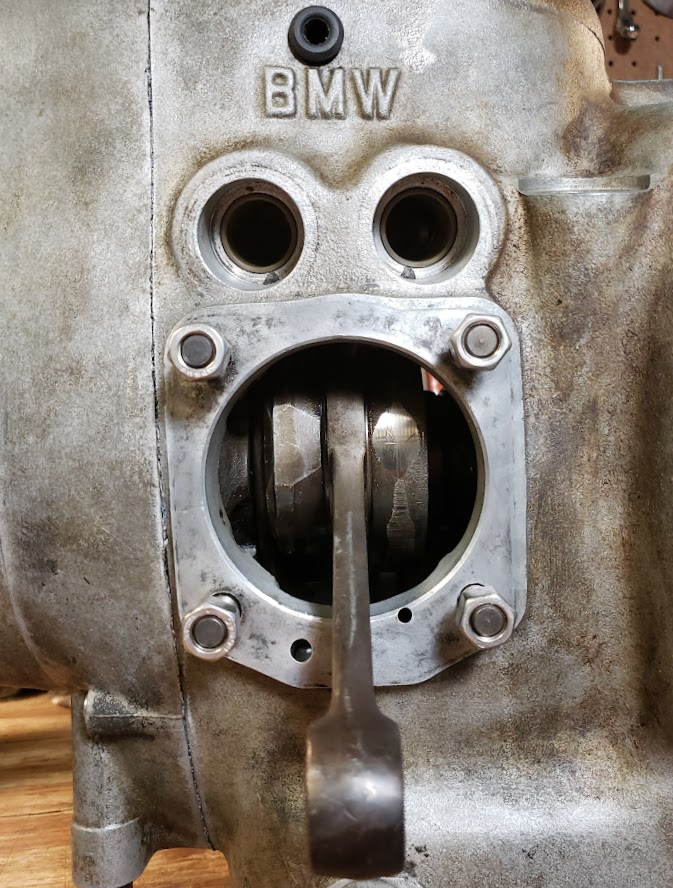
I also opted to not replace the rear "hemispherical" bearing (pt #07119983301). Instead I'll be using 2 of the front crank bearings (pt #07119981245). Riots may ensue, but to me and others I have spoken with, this is just such an odd bearing design and seems to ask for trouble. The true replacements are also quite expensive so this is how I roll. The old one makes a cool paperweight.
I had a sheared flywheel woodruff key which had to be removed and cleaned as well. The flywheel was still within tolerance runout before disassembly - but timing it would probably have never worked.
There was a little debate about my rod bearings - but I decided to run them. After researching the rebuild process - yikes. The crank overall was within spec and there is minimal (if any) lateral movement on the rods. If they knock - and I don't expect them to - that will be for another day. All passages are clear and oil is passing freely.
Engine Reassembly
And now just for gratuitous photos - because I'm so happy. Feel like a major corner has been turned.
Re: Old dirty r69 - from basket to bike.
Short update here - thanks to Micha. I knew something felt odd about the way I folded that tab...
The Roller Comes Together
Mismatch bitsa hodgepodge - call it what you will.
There are at least 5 paint jobs at play here. 3 on the frame alone. I had a "better" tank that I went with, mostly for the pinstripes. Some of the black is new and some is new that I did and some is old as hell.
Suspension is fully restored all around with new/old/good absorbers (2 of my originals were blown beyond redemption) plus new silent blocks (as 2 of mine were missing). All bright work redone. I completely rebuilt the steering damper with new friction plates. All new bolts, rebuilt tool compartment door, new rack, and lots of other little things.
Cool date stamp detail on the springs.
The headlight ears were mismatched and I was able to verify that the smaller non adjustable one is correct. Amazingly, I found its sister out on ebay one day. Both needed minor weld and dent repairs, and I ended up painting them just to protect the exposed metal after the fact.
Starting to look like a motorcycle now...
Handlebars & Levers to Nowhere....
This basically entailed adjusting the bottom side of the switch housing to better fit the perch contour, and then drilling and tapping some holes. I did 2, but you might get way with just one. I have seen an original perch casting with a molded in spot for this lever, so I'm pretty sure mine is not 100% correct. I also know that having this leaver to advance and retard timing is... maybe not the best idea? I was given what I think is good advice to leave the cable disconnected, so people who love levers and knobs like me don't monkey with it while it's parked somewhere. SO - at the end of the day I have a ridiculously expensive clutch control, with a spark advance lever that is close but not quite right, which is really all just for show anyway. But, weirdly, I am sleeping better...
Since you can't have one nice side and one crap side - I restored the original throttle control to match it.
I don't know why - but I like these weird old not stock handlebars. I think I'm gonna run them for now. Here's a comparison against a stock high bar set.